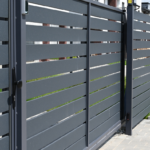
Metal fence panels are not only durable and secure but also add a touch of sophistication to any property. Whether you’re looking to enhance security, increase privacy, or improve your property’s aesthetic appeal, installing metal fence panels is a fantastic choice. In this guide, we’ll walk you through the step-by-step process of metal fence panel installation, ensuring a successful project that stands the test of time.
Section 1: Planning Your Metal Fence Installation
Before diving into the installation process, careful planning is crucial. Consider the following key aspects:
- Define Your Purpose:
Clearly identify the purpose of your metal fence – whether it’s for security, privacy, or decorative purposes. - Choose the Right Type of Metal:
Select a metal that suits your needs and climate. Common choices include aluminum, steel, and wrought iron, each with its unique characteristics. - Measure and Mark:
Measure your property carefully and mark the exact locations for the fence posts. Ensure accurate measurements to avoid any issues during installation.
Section 2: Gathering Materials and Tools
To ensure a smooth installation process, gather all the necessary materials and tools:
- Materials:
- Metal fence panels
- Fence posts
- Concrete mix
- Gravel
- Screws/nails
- Post caps
- Gate (if applicable)
- Tools:
- Level
- Screwdriver/drill
- Tape measure
- Shovel
- Post hole digger
- Mixing tub for concrete
Section 3: Step-by-Step Installation Guide
Follow these steps for a successful metal fence panel installation:
- Digging Fence Post Holes:
Use a post hole digger to create holes for the fence posts. Ensure that the holes are deep enough to provide stability and support for the fence. - Setting Fence Posts:
Place the fence posts in the holes and fill them with a concrete mix. Use a level to ensure the posts are perfectly vertical. Allow the concrete to set before proceeding. - Attaching Metal Fence Panels:
Once the posts are secure, attach the metal fence panels to them using screws or nails. Ensure that the panels are level and evenly spaced. - Installing Gates (if applicable):
If your metal fence includes a gate, follow the manufacturer’s instructions for proper installation. Ensure that the gate swings freely and latches securely.
Section 4: Maintenance Tips for Longevity
To maximize the lifespan of your metal fence, consider these maintenance tips:
- Regular Inspections:
Periodically inspect your fence for signs of rust, damage, or loose components. Address any issues promptly to prevent further damage. - Cleaning:
Clean your metal fence panels regularly to remove dirt, debris, and any potential contaminants. Use a mild detergent and a soft brush or sponge. - Protect Against Rust:
If your fence is susceptible to rust, consider applying a protective coating or paint to prevent oxidation.
Conclusion:
Installing metal fence panels is a rewarding project that enhances both the security and visual appeal of your property. By carefully planning, gathering the right materials, and following a systematic installation process, you can enjoy the benefits of a sturdy and stylish metal fence for years to come.